
This is another 3D modelling work by Andrés using Zmodeler. This is a conversion from the original Marcopolo Viale bus for MM2. This vehicle is designed to replace the default bus from the video games Grand Theft Auto III and GTA: Vice City, developed by Rockstar North.
This vehicle was designed based on the brazilian bus Marcopolo Viale. Below you can see a screenshot from the bus in the GTA III and Vice City running on Windows.
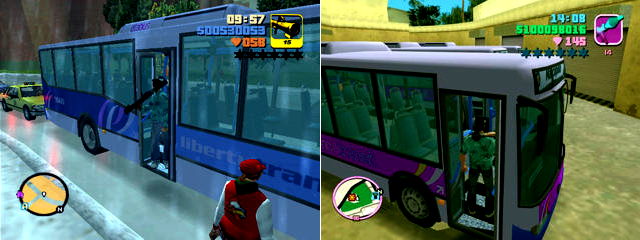
This was the very first GTA vehicle model that actually allowed the character to step into the bus and travel around the city while driven by the game’s AI. The model features different skins for GTA III and Vice City editions.
The custom handling file for inserting the specific bus settings can be easily configured with another software designed by Andrés: GTA Editor.
These vehicle model was launched circa 2003 (GTA III) and 2005 (GTA: ViceCity).
Download
| File: | bus_viale_gta3.zip |
| Size: | 454 KB |
| Compatibility: | GTA III |
| Download | |
|---|---|
| File: | bus_viale_gtavc.zip |
| Size: | 460 KB |
| Compatibility: | GTA Vice City |
| Download | |
The ZIP files include the relevant handling values for replacing the default bus.
Installation Instructions
Below are the original manual install instructions. Steps 12 to 16 should be ignored and use GTA Editor instead to configure those files automatically.
Installing this vehicle will replace the current bus from the game. The steps for installation are:
- After you download the file correct version for your game, unzip it to any folder
- Open the program IMGTool and go to File > Open, open the file [GTA path]\models\gta3.img.
- Select the file bus.txd inside IMGTool. Press the Delete key to remove it. Go to Commands > Add and add the unzipped file bus.txd.
- Repeat previous step with the file bus.dff.
- (GTA3 users only) Go to File > Close. Open the file [GTA path]\models\txd.img. Replace the file bus.txd as explained in step 3.
- Go to File > Close.
- Open the program CollEdit and click Load, load the file [GTA path]\models\coll\vehicles.col.
- In the vehicles list at the top select the file “bus”. Click the Replace button.
- You must select a collision file now. If you don’t want to walk through the seats when you are inside the bus, use the file bus(nowalkthrough).col. If you prefer to make your travels in the bus more comfortable and secure, use the bus.col file, which allows walking through seats.
- In the popup window select bus and click Replace.
- Click Save. Now you can close this program.
- Open with Notepad the file [GTA path]\data\handling.ide (or use the free tool GTA Editor)
- Replace the line that begins with BUS with the appropiate line from the file bus.txt. Save and close Notepad.
- Install the WheelMod (required for using custom wheels)
- Open with Notepad the file [GTA path]\data\default.ide (or use the free tool GTA Editor)
- In the line that contains the bus information, replace the value prior to the last one with 089 for GTA3, or 249 for ViceCity. Replace the last value with 1.05. Save the file and close Notepad.
Credits
- Original design for Midtown Madness 2 by Andres.
- Conversion coordination and testing by Celestron.
- 3D modeling and textures by Andres.
- Handling file by Cerbera.
- Collision file by WiseBoi84.
Disclaimer
The content in this post is for general information purposes only. The information is provided by the author and/or external sources and while we endeavour to keep the information up to date and correct, we make no representations or warranties of any kind, express or implied, about the completeness, accuracy, reliability, suitability or availability with respect to the website or the information, products, services, or related graphics contained on the post for any purpose. Some of the content and images used in this post may be copyrighted by their respective owners. The use of such materials is intended to be for educational and informational purposes only, and is not intended to infringe on the copyrights of any individuals or entities. If you believe that any content or images used here violate your copyright, please contact us and we will take appropriate measures to remove or attribute the material in question.