
Ocassionally, a new Cordova or plugin version will force you to upgrade your Gradle version. This process must be performed with caution, and this article shows how to properly upgrade or revert your Gradle version for Windows and MacOS.
![]()
Steps to update Gradle for Apache Cordova
Carefully follow the following steps to successfully update your Gradle version and rebuild your Cordova app with the newly installed version.
1: Stop gradle daemon
Run this command to stop any active gradle services, if any:
gradle --stop
2. Delete gradle cache
Locate and delete the gradle cache folder:
Unix: %USER_HOME%\.gradle\caches\
Windows: C:\Users\Andres\.gradle\caches\
To free up space, you may delete the other folders in the same level of the cache folder if you don’t plan to use the other versions anymore.
3. Download a new gradle version
Rather than directly jumping to the latest Gradle version, choose a version compatible with the desired gradle plugin for Android.
Gradle and Gradle Plugin Version Support Update
-
- [email protected] has increased the default Gradle version to 6.5.
- [email protected] has increased the Gradle Plugin to version 4.0.0
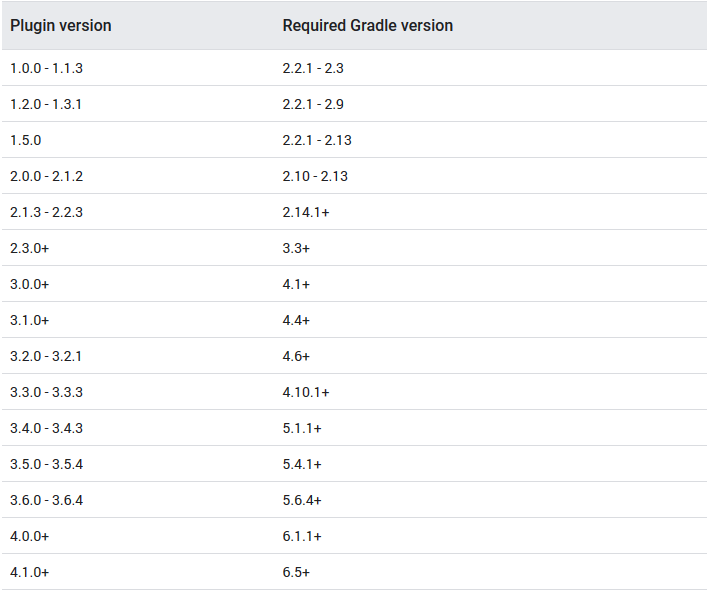
Android Gradle version compatibility
Download the desired gradle version from the Gradle Distributions site. In this case I’m downloading gradle-5.1.1-bin.zip.
4. Unzip the downloaded file
Place the contents of the downloaded ZIP in any location such as C:\gradle\gradle-5.1.1
5. Add the bin path to environment variables
To edit environment variables in Windows I use Rapid Environment Editor but you can use the clumsy editor provided by Microsoft.
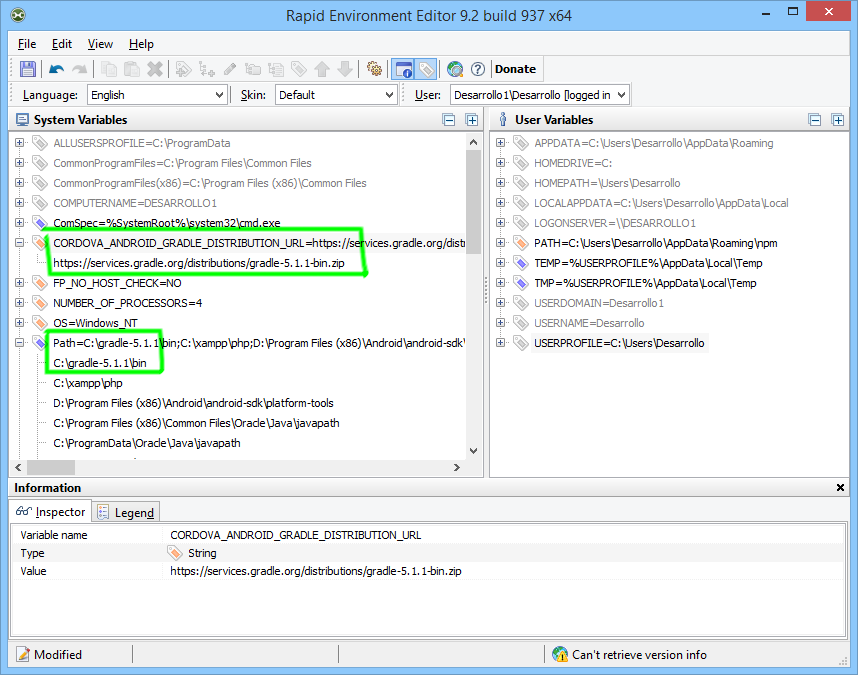
Upgrade Gradle Version in Windows for Cordova
Set the CORDOVA_ANDROID_GRADLE_DISTRIBUTION_URL system variable to the URL of the downloaded gradle ZIP file:
https://services.gradle.org/distributions/gradle-5.1.1-bin.zip
Add to the location you used in step 4 to the Path system variable:
C:\gradle\gradle-5.1.1\bin
Save the variables from the File > Save menu if using the Rapid Environment Editor tool.
6. Close opened command prompts and IDEs
Close any opened command prompts windows, otherwise your new environment variables won’t be updated. Also restart NetBeans, Visual Studio or whaever IDE you’re using.
7. Check the new version
To check if the new version was installed correctly, run this command:
gradle -v
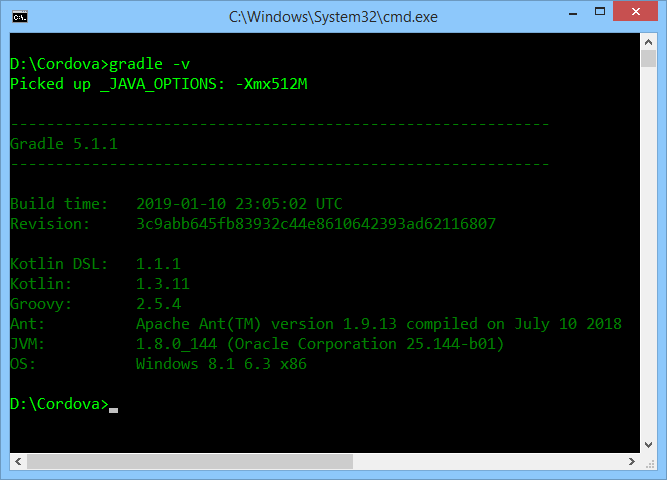
Gradle version for Cordova
8. Re-add the android platform from your app
cordova platform rm android
cordova platform add android
9. Clean your project (optional)
cordova prepare
cordova clean
10. Check your project’s dependencies
To check if there are any dependency conflicts with your app, open the command prompt at your platforms/android folder and run this command:
gradle app:dependencies
Troubleshooting Cordova build errors
Check out this article if you get build errors after changing your gradle version: Common Apache Cordova build errors with Android
Also, switching gradle versions is another valid method to fix plugin-related errors.
Disclaimer
The content in this post is for general information purposes only. The information is provided by the author and/or external sources and while we endeavour to keep the information up to date and correct, we make no representations or warranties of any kind, express or implied, about the completeness, accuracy, reliability, suitability or availability with respect to the website or the information, products, services, or related graphics contained on the post for any purpose. Some of the content and images used in this post may be copyrighted by their respective owners. The use of such materials is intended to be for educational and informational purposes only, and is not intended to infringe on the copyrights of any individuals or entities. If you believe that any content or images used here violate your copyright, please contact us and we will take appropriate measures to remove or attribute the material in question.