
This brief guide shows how to make a few tweaks to fix some issues with Apache Cordova 10 and 11 projects in the NetBeans IDE. Fix incompatible Cordova projects and plugin errors in NetBeans.
![]()
Setup Cordova, NodeJS and Gradle
First, you must have installed Cordova, Node and Gradle. This guide does not focus on how to install those components, these are relatively simple tasks.
Create missing hooks folder
Starting Cordova 10, building cordova apps in NetBeans will throw these errors:
- Cordova Resources not created
- No build tools (e.g. Grunt) used in this project
- Cordova version 3 or greater required when trying to create Cordova resources.

Cordova 10 CLI error creating Cordova resources
To fix this error, simply create the missing hooks folder under your main project folder.
Fix Build, Clean+Build buttons
The same Cordova version 3 or greater required error interferes with the CLI 10 build process. Follow these steps to fix this error:
- Open the nbproject/build.xml
- In the <target name=”check-cordova-version”> section, delete these lines:
<checkVersion first="${cordova.version}" property="cordova.ver.3"/>
<fail message="Cordova version 3 or greater required." unless="cordova.ver.3"/>
The Cordova Plugins tab in Project Properties
The following dialog was designed to add standard plugins for your Cordova app from NetBeans, but you must not use it for the reason outlined below, because adding plugins here will cause your build to fail due to an invalid / obsolete URL provided by NetBeans.
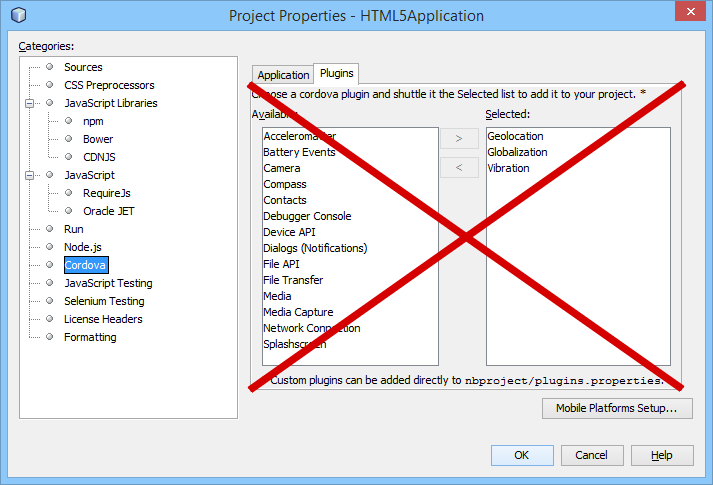
Avoid using the NetBeans Cordova Plugins manager
Adding those default plugins will insert them to the plugin.properties file with an invalid source URL, therefore your build will fail. Sample URL used for device plugin:
cordova-plugin-device=https://git-wip-us.apache.org/repos/asf/cordova-plugin-device.git
Solution
To prevent plugin-related errors, simply disable NetBeans’ plugin.properties file and install uninstall / update your app’s Cordova plugins manually from the command line window.
To switch to command line-only plugin management, follow these steps:
- Open the nbproject/build.xml and replace this:
<target name="update-plugins">
    <plugintask/>
</target>
- With this:
<target name="update-plugins">
    <echo level="info" message="Ignoring the update-plugins section, please manage plugins from the command line" />
</target>
Save the file, and now whenever you build your app from NetBeans, it will neither install nor delete plugins. From now on, manage plugins with the cordova plugin add … and cordova plugin rm … command.

Cordova plugins from NetBeans npm section
You can still see that installed plugins from the npm Libraries item, and view their versions by accessing the npm Libraries Properties dialog.
Fix the Clean and Build Project buttons
NetBeans IDE Toolbar
Whenever you try to build or clean your initial Apache Cordova app in NetBeans, you may receive the following error:
build.xml:285: Execute failed:
java.io.IOException: Cannot run program “.\gradlew” (in directory …): CreateProcess error=2, The system cannot find the file specified
Solution
Open the nbproject/build.xml file and replace:
<target name="clean-android" depends="check-android-template" if="android.generated.exists">
    <exec executable="./gradlew" dir="platforms/android">
        <arg value="clean" />
    </exec>
</target>
with:
<target name="clean-android" depends="check-android-template" if="android.generated.exists">
    <exec executable="gradlew.bat" dir="platforms/android" resolveexecutable="true">
        <arg value="clean" />
    </exec>
</target>
Save and close this file.
Now you can use the Clean and Build Project and Clean Project toolbar buttons normally, and the project will be cleaned just like when you type cordova clean in the command line.

NetBeans Cordova Clean command output
Please remember that this Build button generates a debug (unsigned) APK. To create a signed APK, use the build command from the command line like this:
cordova build android --release
Duplicated config.xml file in www folder
Starting Cordova CLI 10, a new config.xml file will be created by NetBeans in the www folder everytime the app is built. This file is totally irrelevant and not used by Cordova, so you can safely ignore or delete it.
Set target Android SDK version
To change the default Android SDK target version used in your NetBeans Cordova app, simplu open the config.xml file and add these lines or edit them accordingly with your desired target SDK version number.
<preference name="android-minSdkVersion" value="19" />
<preference name="android-targetSdkVersion" value="33" />
By setting minSdkVersion to 19 it means your app requires at least Android 4.4. Check the Android Codenames, Tags, and Build Numbers table for more information.
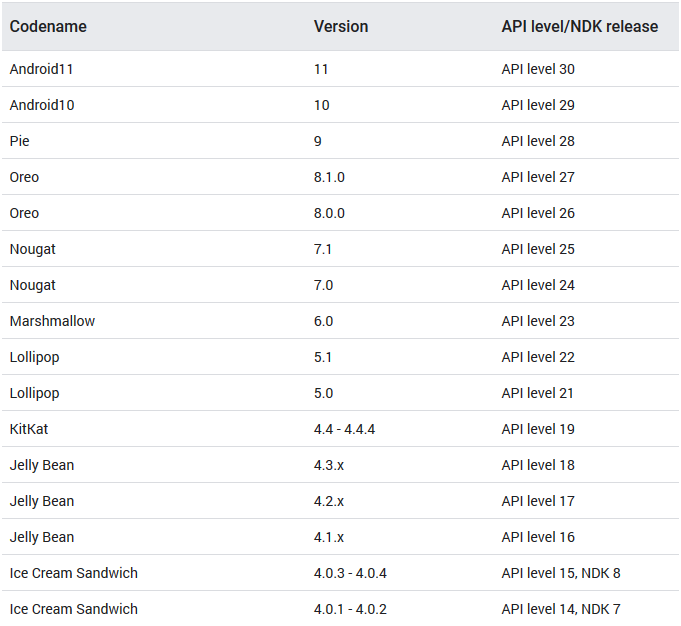
Android build numbers and codenames
Open platforms/android/build.gradle and make sure your repositories and build tools versions and targets are set as follows:
buildscript {
    repositories {
        google()
        jcenter()
        mavenCentral()
    }
    dependencies {
        // NOTE: Do not place your application dependencies here; they belong
        // in the individual module build.gradle files
        classpath 'com.android.tools.build:gradle:3.4.3'
    }
}
allprojects {
    repositories {
        google()
        jcenter()
        mavenCentral()
    }
    //This replaces project.properties w.r.t. build settings
    project.ext {
      defaultBuildToolsVersion="29.0.3" //String
      defaultMinSdkVersion=19 //Integer - Minimum requirement is Android 4.4
      defaultTargetSdkVersion=29 //Integer - We ALWAYS target the latest by default
      defaultCompileSdkVersion=29 //Integer - We ALWAYS compile with the latest by default
    }
}
task clean(type: Delete) {
    delete rootProject.buildDir
}
Disclaimer
The content in this post is for general information purposes only. The information is provided by the author and/or external sources and while we endeavour to keep the information up to date and correct, we make no representations or warranties of any kind, express or implied, about the completeness, accuracy, reliability, suitability or availability with respect to the website or the information, products, services, or related graphics contained on the post for any purpose. Some of the content and images used in this post may be copyrighted by their respective owners. The use of such materials is intended to be for educational and informational purposes only, and is not intended to infringe on the copyrights of any individuals or entities. If you believe that any content or images used here violate your copyright, please contact us and we will take appropriate measures to remove or attribute the material in question.