
Whenever you migrate from the Stable Diffusion webui known as automatic1111 to the modern and more powerful ComfyUI, you’ll be facing some issues to get started easily.
Why switch from automatic1111 to Comfy
One of the reasons to switch from the stable diffusion webui known as automatic1111 to the newer ComfyUI is the much better memory management. I had plenty of CUDA out of memory errors in a1111 with my 6GB GXT1660. ComfyUI avoids all this VRAM and RAM issues easily.
Notice that this tool is completely different from the webui. The Community Manual is incomplete, lacks examples and uses a technical language largely useless for newcomers.
Wile the workflow logic can be intimidating at first, once you get used to it you’ll understand how Stable Diffusion works in a lower level, and you’ll be able to create more complex and intrincate images with a great deal of control.
Loading a PNG (with embedded generation data) to see its workflow is very useful to start understanding the workflow, but it’s not nearly enough. This FAQ was created from some of the best answers to my post on reddit.
ComfyUI FAQ
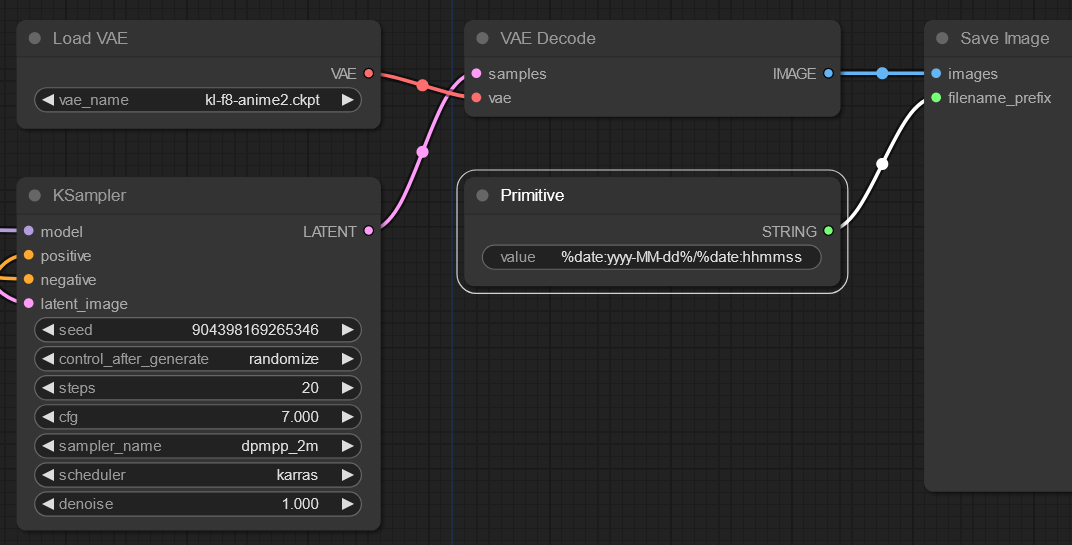
How to set output filename with current date in path?
Using a Primitive node connected to your Save Image node you can customize the output file path and file name of your generated images.
Use this value to set individual folders for current date: %date:yyyy-MM-dd%/%date:hhmmss%_%KSampler.seed%
 You can add date, time, model, seed, and any other workflow value to the output name as explained here: Change output file names in ComfyUI
What is the «CLIP Set Last Layer» node used for?
There are like 12 layers in the CLIP model that get more and more specific. To set a clip skip of 1 is to not skip any layers, and to use all 12. A clip skip of 2 omits the final layer. CLIP set last layer inverts this, where -1 is the last layer (process all),-2 omits the last one, -3 omits the last 2, and so forth.
Generally speaking, the more layers you skip, the less detailed the image will be. Some models work better with -2, so this is the recommended value if you wish. A more detailed explanation can be found here: Clip Skip
As CLIP is a neural network, it means that it has a lot of layers. Your prompt is digitized in a simple way, and then fed through layers. You get numerical representation of the prompt after the 1st layer, you feed that into the second layer, you feed the result of that into third, etc, until you get to the last layer, and that’s the output of CLIP that is used in stable diffusion. This is the slider value of 1. But you can stop early, and use the output of the next to last layer – that’s slider value of 2. The earlier you stop, the less layers of neural network have worked on the prompt.
Where to download ComfyUI extensions or plugins?
Here’s a selection of some of the most popular plugins for ComfyUI. The recommended plugins to get started are:
- ComfyUI-Custom-Scripts: Adds options to auto-arrange graph, snap to grid, custom colors, favicon status, image feed panel, lock/unlock nodes, math expressions, etc.
- Davemane42’s Custom Node: Adds MultiAreaConditioning and MultiLatentComposite nodes to visualize prompt areas. Equivalent to the latent couple / two-shot difussion extension.
- ImagesGrid: Creates grids of images to compare different workflow values.
- OpenPose editor: Adds a node to edit open pose skeletons directly from ComfyUI.
How to install ComfyUI plugins?
Copy the plugin’s GitHub URL. Open a new command prompt window in the ComfyUI\custom_nodes folder (by typing cmd in the folder path in Windows Explorer and pressing Enter) and type:
git clone https://github.com/pythongosssss/ComfyUI-Custom-Scripts
Replacing https… with the URL of your plugin.
How to compare images as in the XYZ plot?
To create a grid of images you need to install a plugin such as the ComfyUI Custom Nodes. Notice this is not as straightforward as the XYZ plot mode from automatic1111.
How to compare checkpoint models?
You can compare your checkpoint models (without the Custom Nodes plugin) as follows:
- Convert to input your model in the Load Checkpoint node by right-clicking it and selecting convert ckpt_name to input.
- Add a Primitive node (add node > utils > Primitive)
- Link the Load Checkpoint ckpt input to the Primitive node
- On this Primitive node, select the first model from the list that you want to compare.
- Set its control_after_generate to increment.
- Set your batch count to the number of chekpoints you want to compare.
- Click Queue Prompt once and a queue will be created for each checkpoint model.
- Suggestion: use a fixed seed in your KSampler to compare models reusing the same seed number.
The downside is that you cannot cherry-pick your models to compare, as the control_after_generate option will just select the next model from the list after each generated image. Also, after reaching the last model, it does not return to the first. You must manually re-select the first model to make a new comparison.
Is img2img supported and how to use it?
Every Sampler node (the step that actually generates the image) on ComfyUI requires a latent image as an input. To create a new image from scratch you input an Empty Latent Image node, and to do img2img you use a Load Image node and a VAE Encode to load the image and convert it into a Latent Image. The new image will have the same dimensions as the original file.
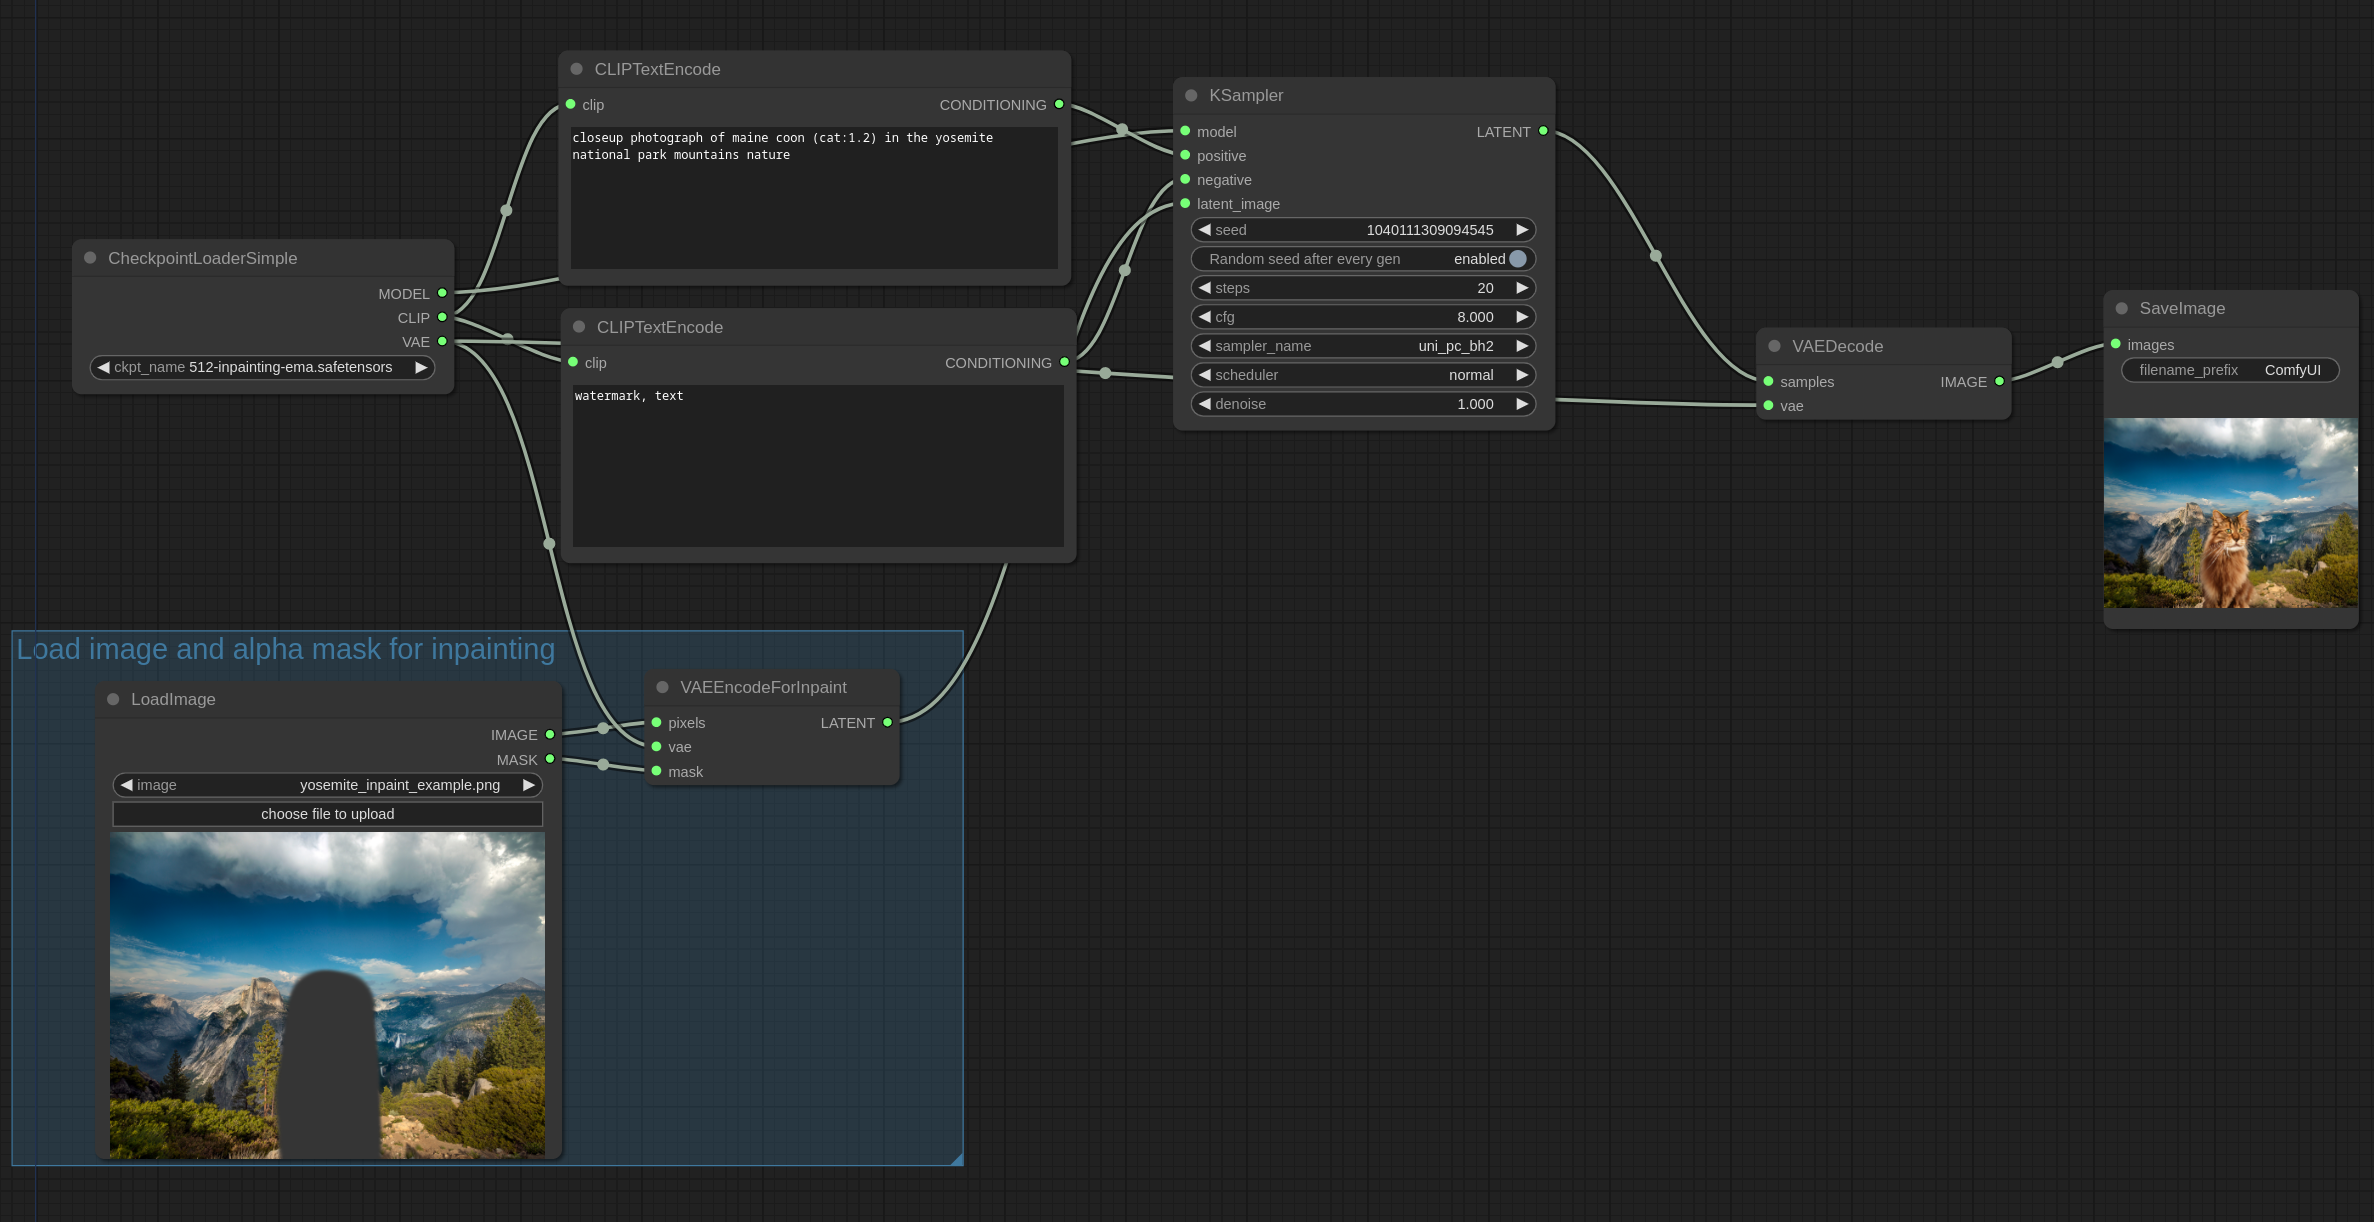
Is inpainting supported and how to use it?
Use the VAEEncodeForInpainting node, give it the image you want to inpaint and the mask, then pass the latent it produces to a KSampler node to inpaint just the masked area.
Here’s the workflow example for inpainting:
 Where are the face restoration models?
The automatic1111 Face restore option that uses CodeFormer or GFPGAN is not present in ComfyUI, however, you’ll notice that it produces better faces anyway. In order to improve faces even more, you can try the FaceDetailer node from the ComfyUI-Impact-Pack plugin.
How to use OpenPose in the workflow?
Using ControlNetApply node with the LoadImage node with a skeleton image as shown in this workflow:
—
You can download open pose skeleton PNG images from Civitai here:
Notice that poses with hands and faces require a resolution large enough to accomodate them, depending on the subject size. Using empty latent sizes of 768×768 on SD 1.5 and 1024×1024 on SDXL is recommended.
How to use LoRAs in the workflow?
Use the Load Lora node connected to your positive and negative prompt nodes. You can cascade multiple loras as shown here and here.
How to reproduce the latent couple/two-shot extension?
The latent couple extension that allows drawing multiple subjects in the same image can be tricky in ComfyUI due to certain limitations. You can use the MultiAreaConditioning node to get started easily, or the native ConditioningSetArea nodes if you don’t want to use the Davemane’s plugin.
How to reproduce the composable lora extension?
The auto1111 composable lora extension is used to limit a LoRA’s scope of influence by associating a LoRA to a specific subprompt (separated with AND). In other words, you can create a single image with multiple LoRA’s, while applying them separately to different blocks of your prompt instead of blending them with the entire image as it would happen normally.
Out of the box, ComfyUI allows any number of prompts, and each of them can be individually connected to its own LoRA. However, limiting the scope of a prompt to certain area is not as easy as it would seem, at least now when using the MutlAreaConditioning node. In this case, the lora effects are averaged between them, creating undesired results.
How to reproduce the same image from a1111 in ComfyUI?
You can’t reproduce the same image in a pixel-perfect fashion, you can only get similar images.
This is because the Empty Latent Image noise on ComfyUI is generated on the CPU while the a1111 UI generates it on the GPU. This makes ComfyUI seeds reproducible across different hardware configurations but makes them different from the ones used by the a1111 webui. This was already discussed on GitHub here.
Disclaimer
The content in this post is for general information purposes only. The information is provided by the author and/or external sources and while we endeavour to keep the information up to date and correct, we make no representations or warranties of any kind, express or implied, about the completeness, accuracy, reliability, suitability or availability with respect to the website or the information, products, services, or related graphics contained on the post for any purpose. Some of the content and images used in this post may be copyrighted by their respective owners. The use of such materials is intended to be for educational and informational purposes only, and is not intended to infringe on the copyrights of any individuals or entities. If you believe that any content or images used here violate your copyright, please contact us and we will take appropriate measures to remove or attribute the material in question.