
In this post, I want to showcase a ComfyUI workflow designed for multi-character scene generation, where three of my extensions work together to solve three different but highly complementary problems.
- Area-based conditioning control using comfyui-lora-pipeline.
- Visual OpenPose editing for poses that are later applied through ControlNet, using comfyui-openpose-studio.
- Global or per-area style application through comfyui-styler-pipeline.
The goal of this workflow is straightforward but powerful: start with a landscape composition, divide the image into four horizontal character areas, assign a dedicated prompt and pose to each region, and then apply a final style layer on top of the whole image. The result is a much more structured and controllable multi-character scene than what you would get from a single prompt alone.
In this example, all four areas use the same Inuyasha multi-character LoRA, while each region is guided by its own pose arrangement. Styling is applied afterward using Styler Pipeline, which helps unify the visual identity of the final image.
What this workflow demonstrates
This workflow is meant to demonstrate how the three extensions complement one another in a practical production scenario:
- Conditioning Pipeline defines where each character prompt should influence the canvas.
- OpenPose Studio provides the pose map that drives the overall body positioning through ControlNet.
- Styler Pipeline injects curated style tags after the scene structure is already established.
This approach is especially useful when you want to keep a scene readable and organized while still preserving the flexibility of prompt-based generation. Instead of asking the model to infer everything from one large text block, the composition is broken into explicit regions with controlled prompt influence.
Full workflow overview
Below is the full workflow used for this example.
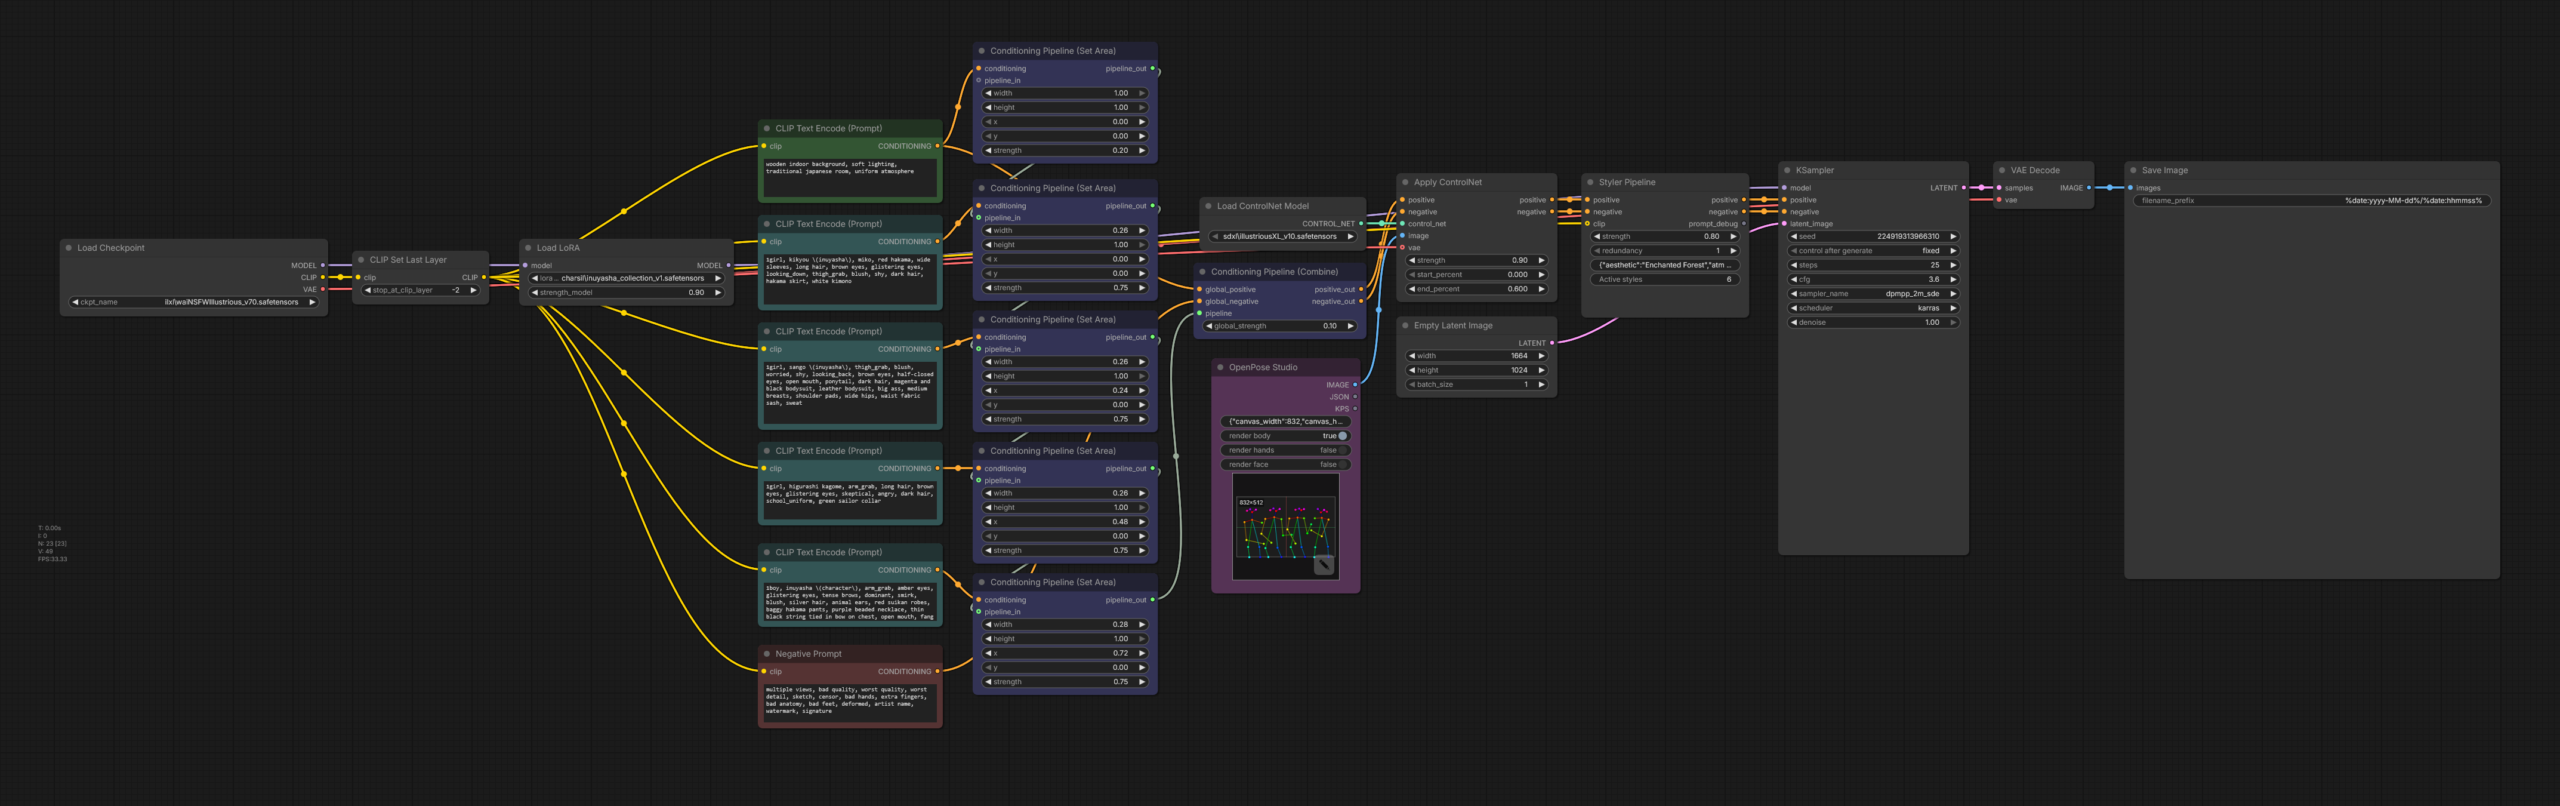 At a high level, the pipeline works like this:
- Load the base checkpoint.
- Load a single multi-character LoRA.
- Create separate prompt branches for each character area.
- Use Conditioning Pipeline (Set Area) nodes to assign each prompt to a different horizontal slice of the image.
- Combine those area conditionings into one unified conditioning output.
- Generate an OpenPose control image using OpenPose Studio.
- Apply that pose map through ControlNet.
- Pass the result through Styler Pipeline to enrich the final visual identity.
- Sample and decode the latent as usual.
Even though the node graph is not very large, it packs a lot of control into a relatively compact setup. The key idea is that scene structure, pose guidance, and style guidance are handled in separate layers instead of being mixed into one single prompt.
The final generated image
Before breaking the workflow down, here is the final generated image this setup produces.
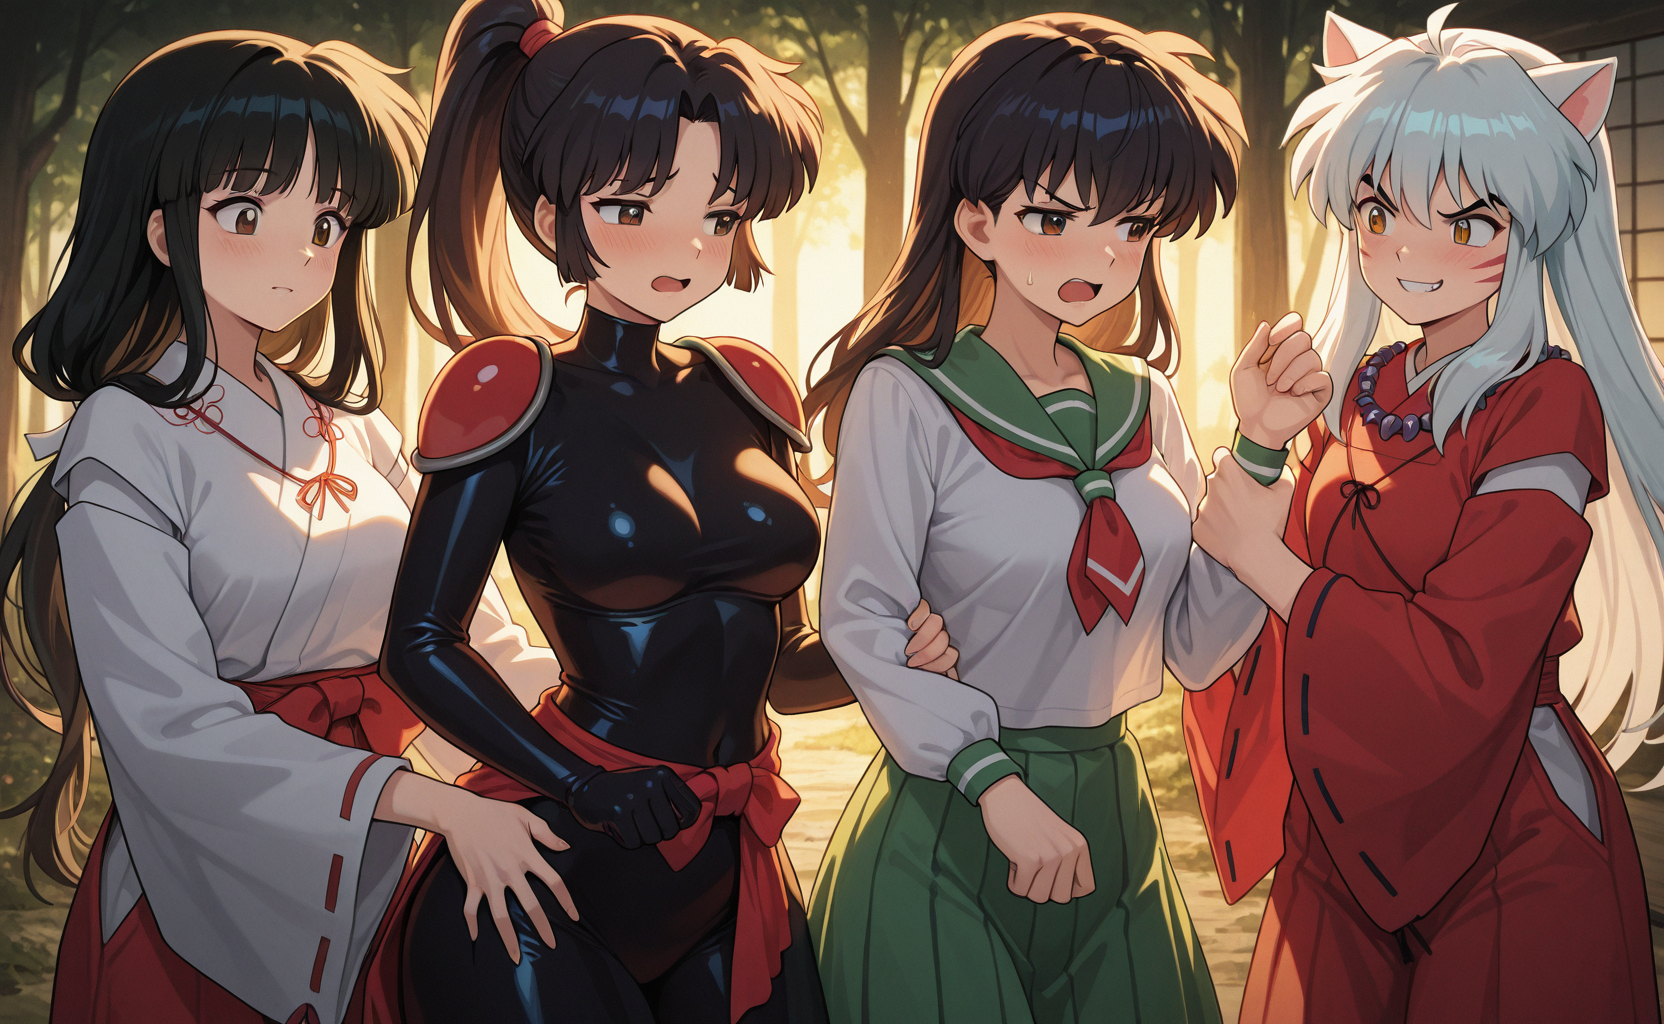 This image is a good example of what makes the workflow effective: four interacting characters share the same scene, each occupies a predictable region, the overall composition remains coherent, and the styling ties everything together into a single visual language. This was created in 25 steps with a regular KSampler node, no inpainting, no masking, and no upscaling.
Base scene structure with Conditioning Pipeline
The structural foundation of this workflow comes from Conditioning Pipeline nodes. Instead of prompting all four characters globally and hoping the model distributes them correctly, the image is divided into explicit regions so each prompt branch influences only its designated slice of the canvas.
Below is a closer look at the nodes used for the area-based conditioning setup.
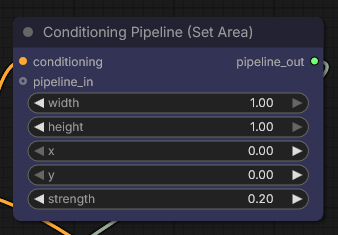
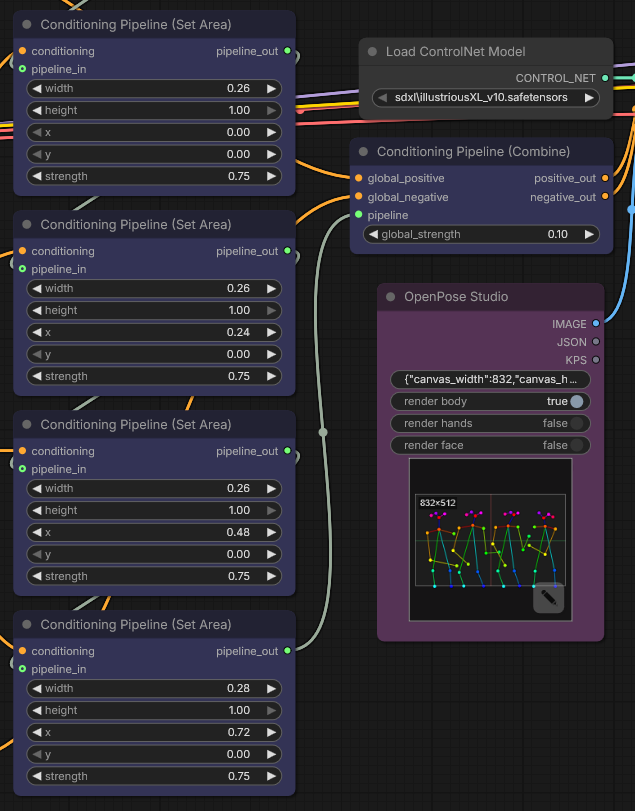 In this workflow, the canvas is effectively split into four vertical character zones using multiple Conditioning Pipeline (Set Area) nodes. Each node defines:
- width: how much horizontal space the area occupies, normalized from 0 to 1.
- height: how much vertical space the area occupies.
- x and y: the normalized starting coordinates of the region.
- strength: how strongly that prompt branch influences the assigned area.
In this example, the areas are arranged side by side across the full width of the image. This is ideal for a four-character lineup or group scene where each subject needs a predictable place in the composition.
The prompts feeding those area nodes describe each individual character separately. That means the model is not left guessing who belongs where. Each character prompt has a dedicated portion of the image to influence.
After that, the per-area branches are merged with Conditioning Pipeline (Combine), which produces the final positive and negative conditioning passed forward into the rest of the graph.
Why area conditioning matters for multi-character scenes
Anyone who has tried generating group scenes with a single monolithic prompt already knows the usual problems: characters merge together, poses overlap, costumes leak between subjects, or one side of the image ends up underdeveloped while another becomes overly dense.
Area conditioning helps reduce those issues by making composition much more explicit. It does not guarantee perfection, but it gives the model a far better structural starting point.
It also opens the door to more advanced workflows, such as:
- Different characters in different zones.
- Different prompt themes per region.
- Different LoRAs per region.
- Different stylistic treatment per region.
In this particular example, I intentionally keep the LoRA shared across all four areas, because the purpose is to demonstrate a clean multi-character composition while preserving a unified character-family look.
Using a single multi-character LoRA across all areas
The full workflow also includes a single LoRA that is applied before the prompt branches are distributed to the individual area nodes.
In this setup, all four character regions share the same Inuyasha multi-character LoRA. This is an important detail because it shows that the workflow does not require a different LoRA per area in order to be useful. Even with a shared LoRA, area-based prompting still gives much more composition control than a traditional one-prompt approach.
At the same time, it is worth noting that comfyui-lora-pipeline also supports more advanced scenarios, including LoRAs per area. That means you can build on this exact same logic later if you want each region to represent a different franchise, character family, outfit set, or stylistic source.
So while this demo keeps things simple by using one shared LoRA, the underlying system scales far beyond this example.
Global background influence with a full-canvas area node
Besides the four character regions, the workflow also includes a more general full-image conditioning layer, shown below.
This node covers the full canvas and is used with a lower strength value. Its purpose is not to override the individual character prompts, but to provide general scene guidance that applies across the entire composition.
This is useful for things like:
- Background mood.
- Shared environmental cues.
- Broad atmospheric consistency.
- Common lighting direction or scene-wide descriptors.
In other words, the workflow is not only dividing characters into regions. It is also layering global conditioning on top of the localized conditioning, which helps keep the final scene cohesive.
Notice that the Styler Pipeline node can easily override the global styles definided by the global prompt, since the recommended weight for the global prompt is generally very low (<0.3), and the Styler Pipeline is applied with a higher strength (0.8).
Pose control with OpenPose Studio
Once the structural conditioning is in place, the next major piece is pose guidance. That is where OpenPose Studio comes in.
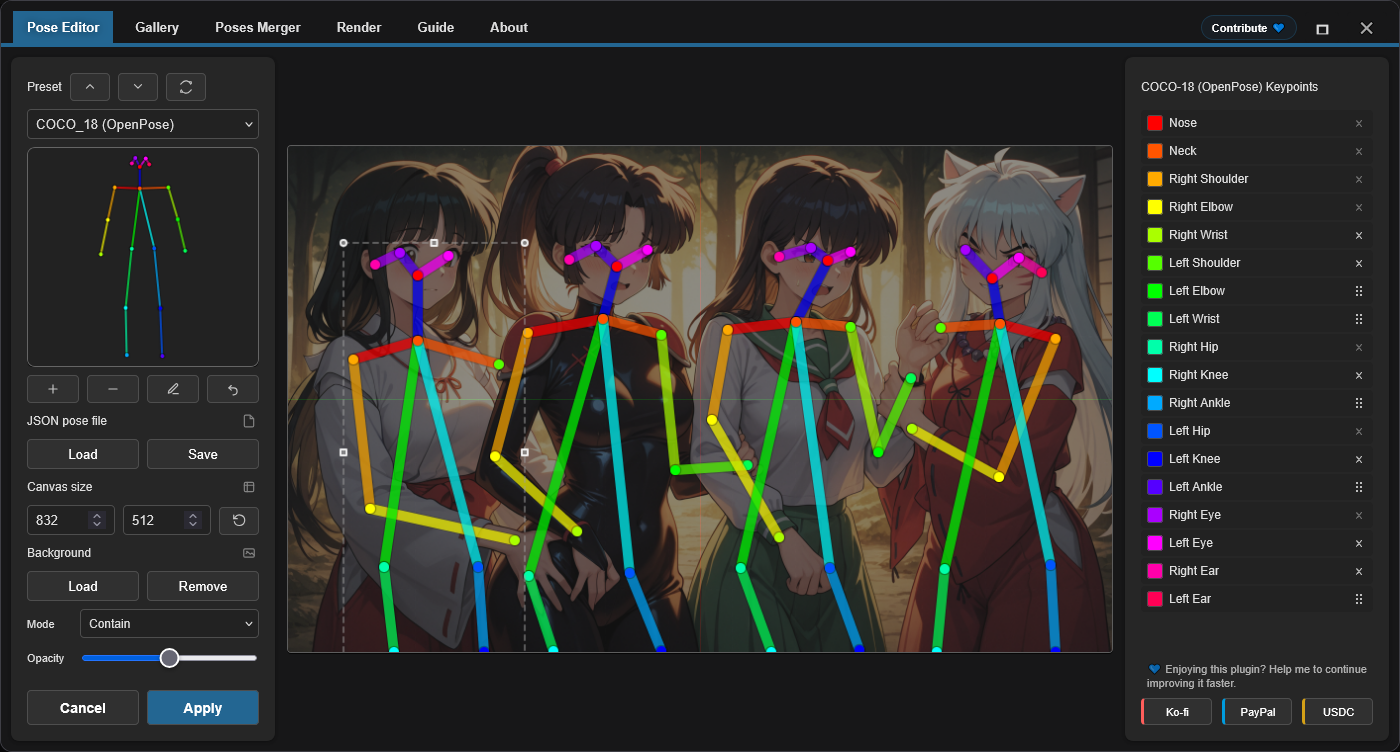 Rather than relying on text prompts alone to describe body positioning, OpenPose Studio lets you visually edit the pose map and generate a control image that can be fed directly into ControlNet.
In this example, the workflow uses a single pose canvas containing four distinct pose figures, arranged to roughly match the four composition areas. Each character in the final image is therefore guided not only by a prompt region, but also by a corresponding visual pose reference.
This is one of the most practical strengths of the setup: prompt regions define where a subject belongs, while the OpenPose map helps define how that subject should stand, lean, or gesture.
An important current limitation
At the moment, the pose-to-area relationship in this workflow is done manually by eye. In other words, the four OpenPose figures are positioned visually so they line up with the four conditioning regions, but the node does not yet receive area metadata directly.
This means the correspondence between pose regions and conditioning regions is currently based on careful manual placement rather than automatic region awareness.
That said, this is already very usable in practice, and support for better area-aware pose workflows is on the roadmap for a future version of OpenPose Studio.
Applying the pose map with ControlNet
After the pose image is created in OpenPose Studio, it is passed into a standard ControlNet workflow. In this case, the pose guidance is applied using an OpenPose-compatible control model.
The important point here is that OpenPose Studio is not replacing ControlNet. Instead, it acts as a much more convenient and flexible way of creating the control input that ControlNet needs.
This makes the process far more iterative. Instead of hunting for an external pose image or manually editing JSON in a less visual way, you can shape the pose layout directly inside the node workflow and immediately test the result.
Style enrichment with Styler Pipeline
Once the composition and poses are already established, the workflow adds a final style layer using Styler Pipeline.
Styler Pipeline node
 AI Styler tab
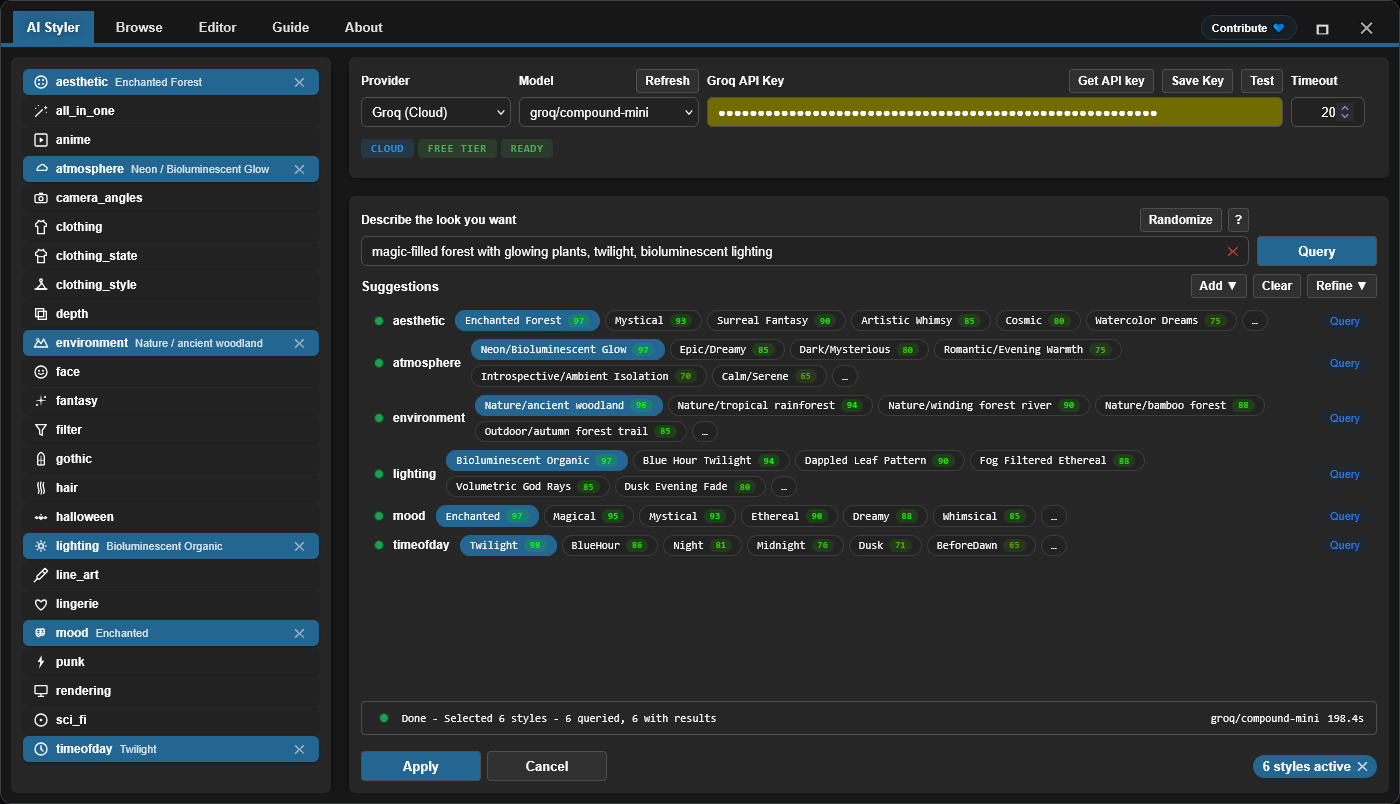 In this example, Styler Pipeline is used to apply a curated set of style tags that reinforce the desired mood of the final scene. The selected style stack includes ideas such as:
- Enchanted forest aesthetics.
- Bioluminescent / neon atmosphere.
- Nature or ancient woodland environment cues.
- Bioluminescent organic lighting.
- Enchanted mood.
- Twilight time-of-day.
This is an important workflow design choice. Rather than overloading the original character prompts with large amounts of style language, the style pass is introduced later as a distinct layer. That usually makes the scene easier to control because character identity, composition, pose, and style are not all competing at the same stage.
Another advantage is that Styler Pipeline can be used either globally or per area, depending on the workflow you want to build. In this post, it is used globally to unify the final image, but the same concept can be extended to more granular regional styling.
Why these three extensions work so well together
What I like about this workflow is that each extension handles a very specific type of control:
- comfyui-lora-pipeline manages where conditioning applies.
- comfyui-openpose-studio manages how characters are posed.
- comfyui-styler-pipeline manages how the final image feels visually.
That separation of concerns is what makes the system practical. Instead of solving everything through one giant prompt (a task doomed to fail), the workflow treats composition, posture, and style as different layers of control.
This is especially valuable for anime, illustration, and multi-character scenes, where prompt ambiguity tends to grow quickly as more subjects are added.
Recommended node breakdown for readers who want to rebuild it
If you want to recreate the workflow yourself, the general node order is:
- Load Checkpoint
- Apply shared LoRA
- Create multiple CLIP prompt branches
- Assign each branch to its own Conditioning Pipeline (Set Area)
- Add an optional global full-canvas conditioning area
- Combine regional conditionings
- Create the pose map inside OpenPose Studio
- Load and apply the OpenPose ControlNet model
- Pass the result through Styler Pipeline
- Run KSampler and decode
This order keeps the workflow easy to reason about. First establish scene structure, then guide body placement, then enrich aesthetics.
Who this workflow is for
This setup is particularly useful for:
- Multi-character anime scenes.
- Character lineups.
- Group illustrations.
- Controlled fan-art compositions.
- Workflows where prompt bleeding between characters is a problem.
- Users who want stronger pose control without leaving ComfyUI.
It is also a good starting point for more advanced future workflows involving per-area LoRAs, per-area style injection, or more intelligent alignment between pose regions and conditioning regions.
Final thoughts
This workflow is a good example of how much more controllable ComfyUI becomes when composition, pose, and style are treated as separate systems instead of being collapsed into one prompt.
Using Conditioning Pipeline, you can explicitly assign prompt influence to different parts of the image. Using OpenPose Studio, you can visually design the pose layout that ControlNet will enforce. Using Styler Pipeline, you can add a strong final visual identity without cluttering the structural prompt logic.
Even in its current form, this workflow is already very effective for building organized four-character scenes. And once tighter area-aware pose integration arrives in future versions, this kind of pipeline will become even more powerful.
Project links
If you are interested in building more controllable multi-character workflows in ComfyUI, these three extensions are designed to work very well together.
Disclaimer
The content in this post is for general information purposes only. The information is provided by the author and/or external sources and while we endeavour to keep the information up to date and correct, we make no representations or warranties of any kind, express or implied, about the completeness, accuracy, reliability, suitability or availability with respect to the website or the information, products, services, or related graphics contained on the post for any purpose. Some of the content and images used in this post may be copyrighted by their respective owners. The use of such materials is intended to be for educational and informational purposes only, and is not intended to infringe on the copyrights of any individuals or entities. If you believe that any content or images used here violate your copyright, please contact us and we will take appropriate measures to remove or attribute the material in question.